Ansible Tutorial: Automating EC2 Configuration with Terraform, Docker, and Jenkins
.svg)
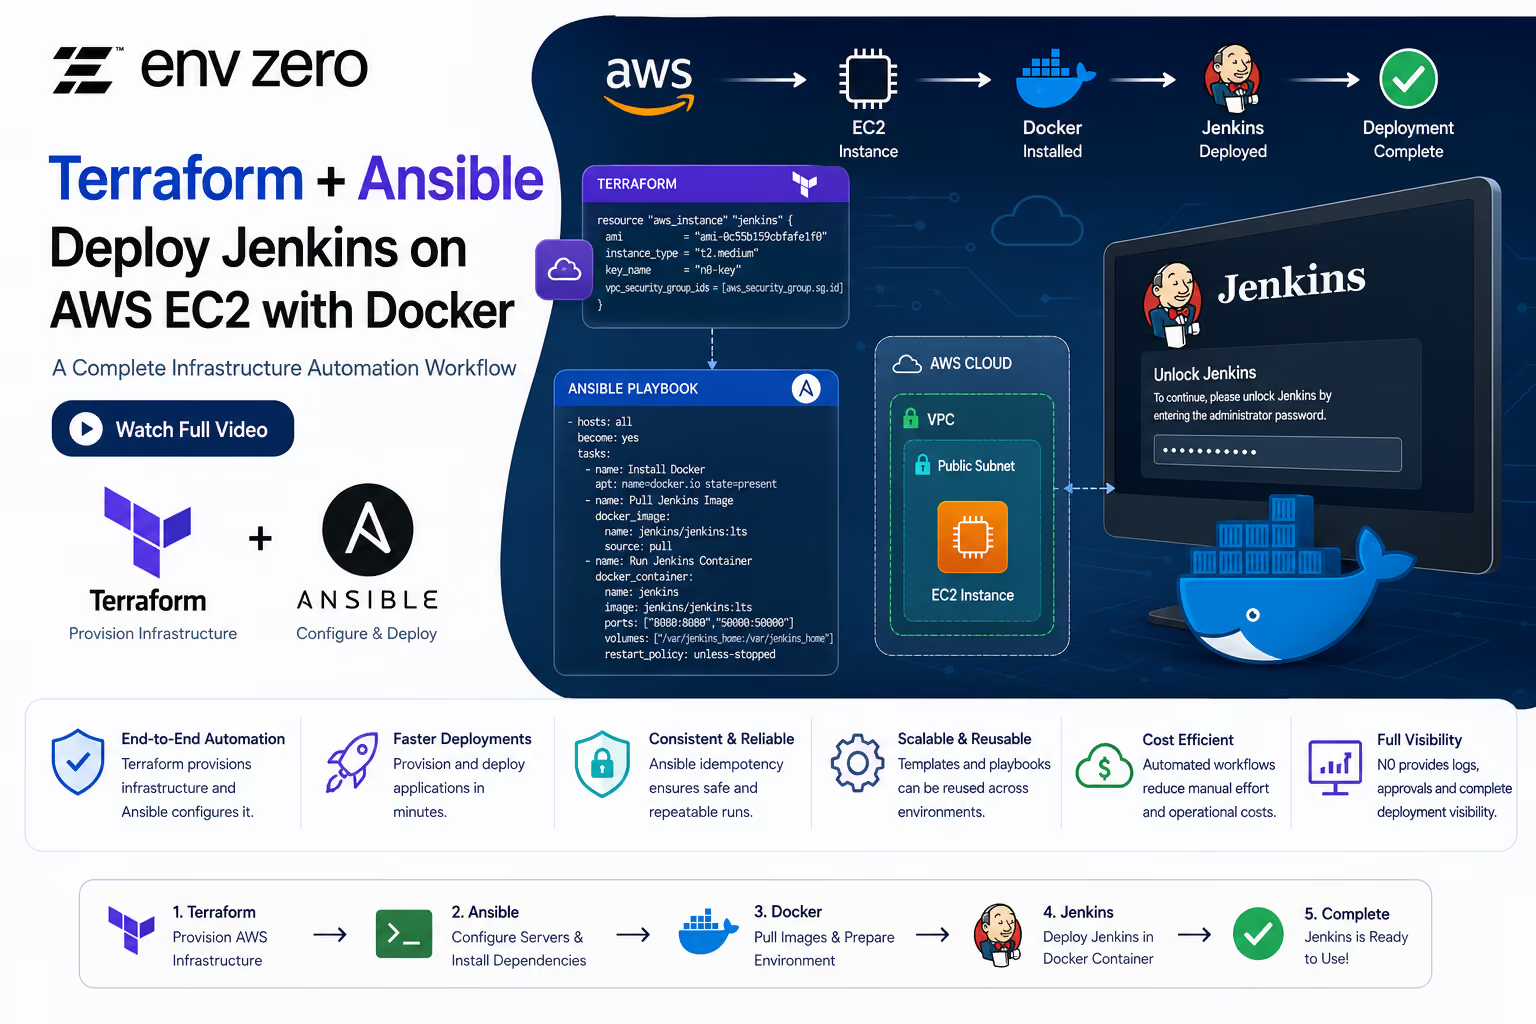

Infrastructure automation has become an essential part of modern DevOps and platform engineering. While Terraform is excellent for provisioning infrastructure, tools like Ansible help automate software installation, configuration management, and application deployment.
In this tutorial, we'll walk through a practical example that combines Terraform and Ansible to create an AWS EC2 instance, install Docker, and deploy Jenkins inside a Docker container. We'll also explore how the same workflow can be managed using N0 (nZero) templates for a more streamlined deployment process.
If you'd like to watch the complete hands-on demonstration and follow along step-by-step, be sure to check out the full video here:
Why Use Ansible?
Ansible is a powerful configuration management and automation tool that enables engineers to automate repetitive tasks across servers and cloud environments.
Key benefits of Ansible include:
- Agentless architecture
- Easy-to-read YAML playbooks
- Infrastructure automation
- Configuration management
- Application deployment
- Idempotent execution (safe to run multiple times)
When paired with Terraform, Ansible creates a complete Infrastructure-as-Code (IaC) workflow where Terraform provisions resources and Ansible configures them.
Step 1: Provision an EC2 Instance Using Terraform
The first step is creating the AWS infrastructure.
Navigate to the Terraform directory and initialize the project:
cd terraform
terraform init
Apply the Terraform configuration:
terraform apply -auto-approve
For demonstration purposes, the -auto-approve flag is used. In production environments, manual approval is recommended.
Terraform creates several AWS resources, including:
- Virtual Private Cloud (VPC)
- TLS Private Key
- AWS Subnet
- Security Group
- Route Table
- Route Table Association
- Internet Gateway
- EC2 Instance
- AWS Key Pair
- Elastic IP Address
Once deployment is complete, Terraform outputs:
- Private SSH Key
- Public IP Address
- Public DNS Name
These outputs will be used by Ansible to connect to the server.
Step 2: Configure the Ansible Inventory File
Ansible requires an inventory file that defines target hosts.
Example inventory structure:
Instead of manually inserting the EC2 IP address, Terraform output can automatically populate the inventory file.
This creates a dynamic workflow where newly provisioned infrastructure becomes immediately available to Ansible.
Step 3: Export the SSH Private Key
Ansible uses SSH to connect to the EC2 instance.
Export the Terraform-generated private key:
Proper permissions are required for successful SSH authentication.
Step 4: Execute the Ansible Playbook
Move into the Ansible directory:
This command instructs Ansible to:
- Use the specified SSH key
- Read hosts from the inventory file
- Execute the defined playbook
Understanding the Ansible Playbook
The playbook targets all hosts in the inventory:
Task 1: Install Required Packages
The first task installs:
- Python Pip
- Unzip
Example:
Retry logic is included to handle temporary APT lock issues commonly encountered on Ubuntu systems.
Task 2: Add Docker Repository
Before Docker can be installed, Ansible adds Docker's official GPG key and repository.
This ensures the latest Docker packages are available through APT.
Task 3: Install Docker CE
Docker Community Edition is installed:
Docker becomes the runtime environment for Jenkins.
Task 4: Install Docker Python Module
Ansible interacts with Docker through Python modules.
This allows Ansible's Docker modules to manage containers directly.
Task 5: Pull the Jenkins Docker Image
Next, Ansible downloads the Jenkins image:
This ensures the latest Jenkins image is available locally.
Task 6: Configure Jenkins Data Directory
Persistent storage is critical for Jenkins.
Ansible sets ownership and permissions:
This prevents permission-related issues when Jenkins writes data.
Task 7: Deploy the Jenkins Container
Finally, Ansible launches Jenkins:
This configuration ensures Jenkins data persists even if the container is recreated.
Ansible Idempotency Explained
One of Ansible's most valuable features is idempotency.
When the playbook is executed a second time:
ansible-playbook -i inventory playbook.yml
Ansible checks whether each task has already been completed.
If everything is already configured correctly, the output shows:
changed=0
failed=0
This guarantees safe and repeatable deployments.
Accessing Jenkins
Once deployment completes, open:
Jenkins displays the initial setup screen requesting an administrator password.
Retrieving the Jenkins Initial Password
SSH into the EC2 instance:
Copy the password and paste it into the Jenkins setup wizard.
You can then:
- Install recommended plugins
- Skip plugin installation
- Create administrator accounts
- Complete Jenkins setup
Jenkins is now fully operational.
Managing Ansible Through N0 (nZero)
The tutorial also demonstrates deploying the same Ansible workflow using N0 templates.
Creating an Ansible Template
The template includes:
- Template Name
- Ansible Version
- SSH Private Key
- GitHub Repository
- Playbook Location
- Environment Variables
Example inventory variable:
This allows N0 to locate the correct inventory file.
Running Deployments in N0
Once the template is created:
- Create a new environment.
- Select the Ansible template.
- Launch deployment.
- Review logs.
- Approve the run.
N0 automatically:
- Clones the repository
- Loads variables
- Executes the Ansible playbook
- Displays deployment logs
Because the EC2 instance was already configured through the CLI, the deployment shows no additional changes.
Building a Complete Terraform + Ansible Workflow
One of the most powerful capabilities demonstrated is combining Terraform and Ansible into a single automated workflow.
A typical process would be:
Stage 1: Terraform
- Create VPC
- Create Subnets
- Create Security Groups
- Launch EC2 Instances
Stage 2: Ansible
- Install packages
- Configure Docker
- Deploy Jenkins
- Configure applications
This eliminates manual intervention and creates a fully automated infrastructure pipeline.
Benefits of Combining Terraform and Ansible
Terraform Strengths
- Infrastructure provisioning
- Cloud resource management
- State management
- Multi-cloud support
Ansible Strengths
- Configuration management
- Software installation
- Application deployment
- Server automation
Together they provide a complete Infrastructure-as-Code solution.
Conclusion
This hands-on example demonstrates how Terraform and Ansible complement each other in modern DevOps workflows. Terraform provisions AWS infrastructure while Ansible handles software installation and configuration.
Using a simple Ansible playbook, we successfully:
- Provisioned an AWS EC2 instance
- Installed Docker
- Pulled a Jenkins Docker image
- Configured persistent storage
- Deployed a Jenkins container
- Verified idempotent execution
- Managed deployments through N0 templates
For platform engineers, DevOps practitioners, and cloud architects, mastering the combination of Terraform and Ansible is a valuable skill that enables scalable, repeatable, and automated infrastructure deployments.